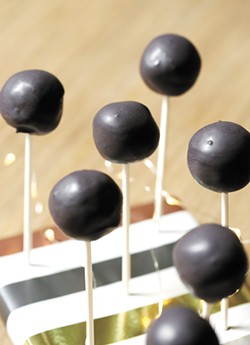
- Don't you dare make perfect cake pops. Lumpy = lovingly homemade. |YOUNG KWAK photo
As we enter the holiday home stretch, it's way too easy to get bogged down with stress as we figure out what to get for family and friends. It's hard to know what everyone might like, and it takes a lot of time, money and effort to find something unique for an entire list of people.
But I'm here to tell you there's an easier way, friend: some holiday baking.
You can't go wrong with sweets, and making a recipe that seems a little complicated, like festive cake pops, is a fun and relatively painless way to impress your loved ones.
And the best part? When your treats inevitably don't turn out perfectly, it's actually an asset. Gifting cake pops that are a tiny bit lumpy, and not the perfect little spheres like you see in magazines, ensures that the recipient knows you made them, and made them with love. Those little homemade touches don't change the flavor at all, and you can make dozens of these in just a few hours to get everyone left on the list checked off.
(If you want to make this recipe even easier, just make a box of cake mix following the directions on the back, and skip ahead to the frosting section).
For the cakes
Butter and flour for pans
2 3/4 cups cake or all purpose flour
1 1/2 cups granulated sugar
3 3/4 teaspoons baking powder
1 teaspoon salt
12 tablespoons room temperature salted butter (1.5 sticks), cut into chunks
3/4 cup milk or milk substitute
2 teaspoons vanilla bean paste, or scrapings from one vanilla bean and 1 teaspoon vanilla extract
4 large room temperature eggs
1. Heat the oven to 350 degrees and butter two 9-inch by 2-inch round cake pans and lightly flour them, tapping out excess. Or use parchment paper and cooking spray; the goal is just to make it easier to pop out the cakes.
2. Sift the flour, sugar, baking powder and salt into a large bowl, mix with a fork and set aside.
3. In a stand mixer, cream the butter with the paddle attachment until soft, then slowly mix in the flour mix on low.
4. Add in the milk and vanilla, then mix in one egg at a time, scraping down the bowl as needed to make sure everything is incorporated.
5. The batter should be smooth before you divide it equally between the two pans. Smooth it to the edges of the pan and bake until golden, about 30 to 35 minutes. Let cakes cool completely in pans on a cooling rack.
For the frosting
2 sticks (16 tablespoons) room temperature salted butter
1 1/2 to 2 1/2 cups powdered sugar
1 teaspoon salt to taste
2 teaspoons vanilla or other flavoring
1. In stand mixer, cream butter and vanilla using the paddle attachment on low speed, then slowly add powdered sugar 1/2 cup at a time until the frosting just comes together. You don't want it to be too dry or the cake pops won't hold together, so just add enough powdered sugar to get the flavor right (at least 1 1/2 cups) and add salt to taste.
For the cake pops
1 or 2 bags of chocolate candy melts in desired colors
Candy sticks
1. Once the cake is fully cooled, crumble one of the rounds in a large bowl by hand, pulling out any crispy edges so there's a uniform soft texture. Add a little less than half of the frosting to the bowl and combine with your hands. This is less scientific and more about how the cake is acting. See if you can roll a ball between your hands, and if it's still too crumbly, add a little more frosting.
2. When the texture is right, roll the cake mix into roughly 1 1/2-inch balls and set them on a baking sheet lined with parchment paper, then move to the fridge to fully cool. (Don't try to make more than one pan at a time; the other cake round can come together in a second batch by repeating these steps and making more frosting if needed.)
3. While the cake balls are cooling, use a double boiler or a heatproof glass bowl on top of a simmering pot of water to warm the candy melts. Once the mixture is just fully melted, carefully remove it from the heat and keep stirring, being careful not to overheat.
4. Work with one cool cake ball at a time, dipping a candy stick half an inch into the melted candy before sticking it into the cake ball. Then use a spoon to ladle the melted candy over the ball while spinning it. Once coated, carefully tap the stick with your finger to encourage any excess to drip off, then stand the pop in a piece of cardboard or styrofoam to cool. With several done, put them in the fridge to cool completely.
5. Get creative! For a fancier look, add sprinkles while the candy is still warm. Wrap a piece of styrofoam in fancy paper for a beautiful display stand. Or cover each pop with plastic and tie with ribbon or twine to deliver them individually. It's up to you, just have fun with it. ♦
Read Again https://www.inlander.com/spokane/homemade-cake-pops-are-a-delicious-gift-for-family-and-friends/Content?oid=15616318Bagikan Berita Ini


0 Response to "Homemade cake pops are a delicious gift for family and friends - Pacific Northwest Inlander"
Post a Comment