How to make butter from scratch – a quick method recipe
Making butter is easy – simply churn cream until it separates into butter and buttermilk. I’ve done this a few times unintentionally when whipping cream for desserts! The fat content of the cream determines the amount of butter – the higher the fat content the greater the yield. Fat content is at its highest in winter and spring, when cows eat a varied diet of grass and flowers.
Salt is added to season the butter and prolong its shelf life. It can be added to taste, but a good ratio is 1.5% of the weight of the butter.
Buttermilk is the by-product of making butter, and it’s a useful ingredient for making granita, salad dressings and brining proteins, because of its acidity and tang, so don’t let it go to waste.
600ml thick cream
Salt
Using an electric mixer, whisk the cream on a medium speed until stiff peaks form. Turn the speed down slightly, and continue to whisk until the cream separates completely into butter and buttermilk.
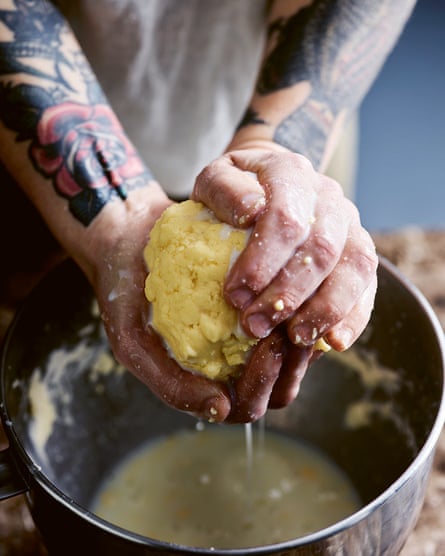
Using your hands, remove the butter from the buttermilk, squeezing as you go. Place the butter in a bowl of ice water – the ice water will solidify the fat and make it easier to keep squeezing.
Squeeze the butter again to remove any remaining buttermilk, and shape it into a ball.
Remove the butter from the ice water, and squeeze again.
Weigh the butter and add 1.5% of its total weight in salt. Massage the salt into the butter to evenly combine.
Place the butter in an airtight container or wrap it in grease-proof paper. The butter will keep for two to three weeks in the fridge, or up to three months in the freezer.
Gluten-free garden bread
(Pictured above)
This is a gluten and dairy-free quick bread recipe. The texture is similar to cornbread but doesn’t use animal fat or buttermilk. Instead, pumpkin puree and grapeseed oil bind the batter and eliminate the need for gums and emulsifiers (often found in store-bought gluten-free baked goods).
You can switch out pumpkin for any vegetable puree that has a similar texture. Leek is another favourite. Top the bread with any veg, seeds, herbs or spices that you like.
You will need to begin this recipe several hours ahead to cool the pumpkin puree.
Makes 1 bread loaf
200g pumpkin puree, cold (see recipe below)
1 egg
180ml grapeseed oil
150g maize
150g polenta
1½ tsp baking powder
¼ tsp garlic powder
1 tsp salt flakes
Olive oil, for drizzling
For the toppings
Red onion, thinly sliced
Zucchini, shaved into long strips
Tomatoes, sliced
Basil leaves
Chilli flakes
Preheat oven to 180C and line a 20×20cm baking tin with baking paper.
Combine the pumpkin puree, egg, oil and 230ml of water in a bowl. In a separate large bowl combine the maize, polenta, baking powder, garlic powder and salt.
Add the wet mix to the dry mix and stir until well combined. Pour the batter into the lined tin and top with an even layer of shaved vegetables, herbs and seasonings of choice.
Drizzle with a small amount of oil then place the tin into the oven for 25 to 30 minutes, or until cooked through. When the bread is done, a skewer inserted will come out clean. Remove from the oven and cool slightly before serving.
Pumpkin puree
500g pumpkin, thinly sliced
Place the pumpkin in a pot and add 1cm of water. Cover the pot and steam the pumpkin over a medium heat for 15 minutes, or until tender.
Drain the pumpkin and puree in a food processor or using a stick blender until smooth. Cool completely before using in the garden bread.
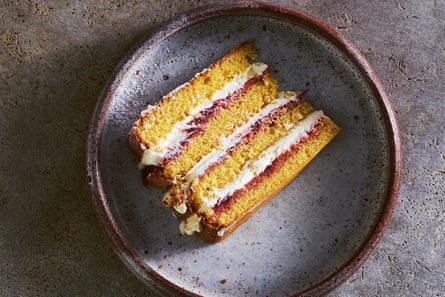
Sponge cake with rhubarb and lemon myrtle jam
My nan was a brilliant home baker. She rescued over-ripe apricots and plums from Queen Victoria Market to make into jams, which meant that week we would be treated to delicious apricot tea cakes, plum drop biscuits and coconut slice. She was a thrifty seasonal preserver and taught me to cook with my hands, eyes and heart, not just the recipe. Some of her recipes are now mine, and I strive for her light touch and to know when to stop mixing!
There are rules to follow to produce a good sponge cake: egg temperature, glass bowls and sifted flour, to name a few. Producing a great sponge cake is about these rules and your senses.
Serves 12
315g caster sugar, plus extra to coat the tin
235g plain flour, plus extra to coat the tin
9g baking powder
100g butter, plus extra for greasing
6 eggs, at room temperature (330g)
300g rhubarb and lemon myrtle jam (recipe below)
400ml cream, whipped
Icing sugar, for dusting
Preheat the oven to 180C and grease and line two 20cm cake tins.
Place a little sugar on the inside edge of the cake tin and roll it around the rim to evenly coat the edge. Pour the excess into the other tin and repeat the process, adding more sugar if needed. Discard any remaining sugar. Repeat the process with flour to coat each tin.
Sift the flour and baking powder three times. Melt the butter with three teaspoons of water in a small pot over a low heat.
Whisk the eggs in a medium bowl until they begin to turn pale and foamy. Add the sugar a third at a time, whisking after each addition. Once thick, pale and creamy, gently but quickly fold the flour and butter into the eggs, retaining as much air as possible. Divide the mixture between the tins and immediately place them in the oven. The quicker this process happens, the more air will remain in the batter. Bake for 30 minutes, or until the sponges spring back when gently pressed on the surface.
Remove the tins from the oven and immediately invert the cakes on to a rack covered with a tea towel to cool completely.
To assemble, cut the cakes in half horizontally. On three of the layers, spread a thin layer of jam across the surface, then top the jam with a layer of whipped cream. Stack the dressed cakes, top with the undressed sponge and dust with a little icing sugar.
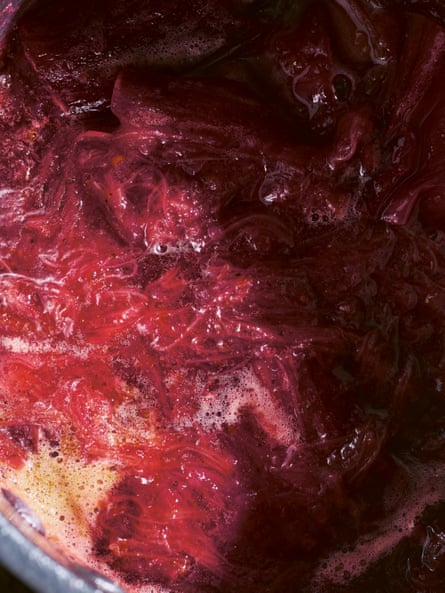
Rhubarb and lemon myrtle jam
Imagine how much abundant ripe produce jam factories have prevented from going to landfill! However, overcooked fruit loaded with refined sugar is not my idea of a good time, so I like to make my own jam to limit the amount of sugar used. Sugar is the preserver in jam, and the ripeness of the fruit determines how much sugar to use.
Making jam with ripe fruit reduces the amount of sugar and the cooking time. The jam will have a brighter flavour too. Add acid towards the end of the cooking process in the form of orange, lemon or lime juice to balance the sweetness. Seal the jam hot for an extended shelf life.
You’ll need some sterilised jars for this recipe (see below).
1.4kg rhubarb, trimmed and cut into 6cm lengths
750g caster sugar
1 orange, zested and juiced
3 pinches ground lemon myrtle
Cook the rhubarb, sugar and orange zest and juice in a covered pot over a medium heat for five minutes to soften the rhubarb and dissolve the sugar.
Uncover and cook for a further 30 to 40 minutes, until thick and glossy. Test the jam is ready by placing a teaspoon of the rhubarb on to a cold plate and tilting the plate – when the jam holds together and doesn’t slide down the plate, it’s ready.
Add the lemon myrtle and stir it through. Pour the hot jam into sterilised jars and seal the jars. Cool completely at room temperature. The jam will last up to 12 months. Refrigerate after opening.
How to sterilise jars and kitchen tools
Clean, sterile equipment is essential for successful and prolonged food preserving. Harmful bacteria cause food spoilage, reduce shelf life, make food unpalatable and can lead to food poisoning. They can appear as colourful moulds, smell astringent or overly funky and taste bitter, but they can also be undetectable.
There are simple steps to reduce the risk of this happening. Practice good personal hygiene by washing your hands, work cleanly to prevent cross contamination and use clean, sterilised equipment.
For general cooking utensils, such as spoons, ladles, thermometers: wash the equipment in hot soapy water and rinse. Fill a pot with water and bring it to the boil. Submerge the equipment into boiling water for one minute then place it on a clean tea towel to dry.
To sterilise glass jars: preheat the oven to 110C and heat the clean jars for 20 minutes. Remove them from the oven and allow them to cool. Place the clean jar lids in boiling water for five minutes.
This is an edited extract from Sustain: Groundbreaking recipes and skills that could save the planet by Jo Barrett, available now through Hardie Grant (RRP $55)
Bagikan Berita Ini


0 Response to "Butter, sponge cake and gluten-free bread: Jo Barrett’s made from scratch recipes - The Guardian"
Post a Comment